Find Hidden Coolant Loss in One Hour: A Fast, Safe Home Test Plan
Apr 22, 2026 • 9 min
If you’re losing coolant and you’re pressed for time, you don’t need to turn your garage into a mechanic’s shop. You need focus. You need a plan.
I’ve used a one-hour diagnostic routine like this more than a dozen times. It isn’t about chasing every possible leak, it’s about hitting the high-yield spots first. Reservoir baselines. Paper towels. A whiff of the heater core. A UV-dye nudge and a simple pressure check you can cobble together with stuff already in your toolbox. If you’re lucky, you fix it. If you’re not lucky, you leave with solid photos and notes to show your mechanic.
And yes, I’ve learned the hard way what happens when you skip a quick check. A few years ago, I owned a car that had a tiny, almost invisible weep by the thermostat housing. It was barely dripping, but it was enough to slowly pull coolant away while I drove to work. I spent days chasing “the obvious leak” before a quick towel under the hose clamps exposed the real culprit. The small habit I added then—document, photograph, and compare—has saved me countless hours since. The micro-moment that stuck with me was how a clean, dry towel under a clamp can suddenly glow with a faint trail when the light hits it just right. It sounds trivial, but it’s the difference between guessing and knowing.
Here’s the plan I actually use. It respects your time, keeps you safe, and gives you actionable results—whether you fix it yourself or hand over photographs to a pro.
Phase 0: Quick safety and kit check (5 minutes)
Safety isn’t optional here. Coolant burns are real, and the system is pressurized when the engine is hot.
- Park on a level surface, engine cold. Never crack the reservoir cap or the radiator cap while the engine is hot. If you’re unsure, wait at least an hour after you’ve driven the car.
- Gather your tools: flashlight, a couple of clean white paper towels, gloves, a notepad, a camera, and a UV flashlight if you’ve got one (or a bright phone flashlight as a stand-in).
- A quick safety aside: if you feel any resistance or hear hissing when you’re opening anything, stop. Reassess and give it more time to cool.
The kit is simple, but the payoff is real. This is where you set yourself up to see things you’d otherwise miss.
Phase 1: Establish the baseline and sweep visually (15 minutes)
This phase gives you a reference point and the lay of the land. You’re looking for what’s normal, so you can spot what’s abnormal later.
Step 1: Reservoir baseline and visual check (5 minutes)
- Locate the coolant reservoir. It’s usually a translucent bottle near the engine. If yours is opaque, you’ll rely more on your other checks.
- With the engine cold, note the level relative to the min/max marks. If it’s low, that’s a clue—but don’t jump to conclusions yet.
- Inspect the reservoir for cracks, staining, or wet spots around the cap and the body. Any dampness here can point to a leak path you’ll want to map later.
- Wipe around the reservoir with a paper towel and look for any new dampness or residue that wasn’t there before. A quick wipe reveals things your eyes miss when you’re focused on the cap.
Quick personal note: the time I found a tiny weep at the plastic neck of the reservoir, it looked dry at first glance. A second wipe under brighter light showed a minute crust from mineral deposits where the leak dried and re-evaporated. It was a lot easier to fix once I saw that telltale line.
Step 2: Paper-towel map (10 minutes)
- Put clean white paper towels or shop rags under the most likely leak zones: radiator seams, hose connections (especially where the upper hose meets the thermostat housing), and beneath the engine block in the tray area.
- Park or run the engine for a short burst if it’s safe to do so. If you’re concerned about safety, do it with the hood closed and the car stationary; you’re just checking for obvious drips, not pressure testing yet.
- After a short period, inspect the towels for damp spots or colored residue. Even tiny moisture can mean a leak that’s currently slow but reusable.
Why this works: many leaks are slow and drip only occasionally. The towels create a dark, obvious signal where your eyes might otherwise miss a faint staining on metal or plastic.
3 quick voice-from-the-field examples to illustrate what you’re looking for:
- A faint pink stain near a clamp can indicate a small weep that wouldn’t make a puddle, but it’s enough to contaminate the coolant over time.
- A little crusty residue around a hose clamp is often the aftermath of tiny, repeated drips.
And a micro-moment I’ll never forget: I once dropped a flashlight into the engine bay, and the beam caught a glimmer of dampness along a seam. It wasn’t dramatic, but that glint—a few seconds of shine—was the turning point in identifying a slow leak.
Phase 2: Scent and heat cues (20 minutes)
Coolant has a characteristic sweet smell when it leaks or burns. You’ll be surprised how often a “soft” smell comes from inside the cabin or under the dash.
Step 3: Heater-core sniff test (10 minutes)
- Turn the heater on high and let the car’s HVAC run for a few minutes with the fan at a comfortable level.
- In a lot of cars, a sweet, syrupy odor inside the cabin signals a heater-core problem. It’s not the only cause of a cabin smell, but it’s a big one to consider when you’ve ruled out external leaks.
- Check the floor mats for dampness or residue. If you’re smelling coolant and seeing damp floors, you’re likely dealing with a heater-core issue or a related hose in the dash area.
Small aside: I once had a cabin full of cinnamon-scented air—no, not a fancy perfume, just a heater core that had sprung a slow leak. It wasn’t dramatic, but the smell was unmistakable. It saved me from chasing an external leak when the real culprit was hiding in the dash.
Step 4: Exhaust trend check (10 minutes)
- With the engine warm, watch the exhaust plume. A normal exhaust on a cold day is white brief steam that fades. Persistent, thick white smoke or a smell of coolant on the wind can indicate you’re burning coolant in the combustion chamber, which points to a head gasket issue or a more serious engine problem.
- Note whether you see coolant in the exhaust or a continuous sweet smell. If the smoke lingers and you can smell sweet coolant, that’s not normal.
Important caution: white smoke isn’t always coolant. Condensation can look similar on cold days. If you see a persistent glow and scent, that’s the clue you want to take seriously.
Real-world tip: some car forums talk about this as a “true” coolant burn. Hearing the nuance from real owners helped me understand that it isn’t just about what you see, but the persistence and the scent that matter.
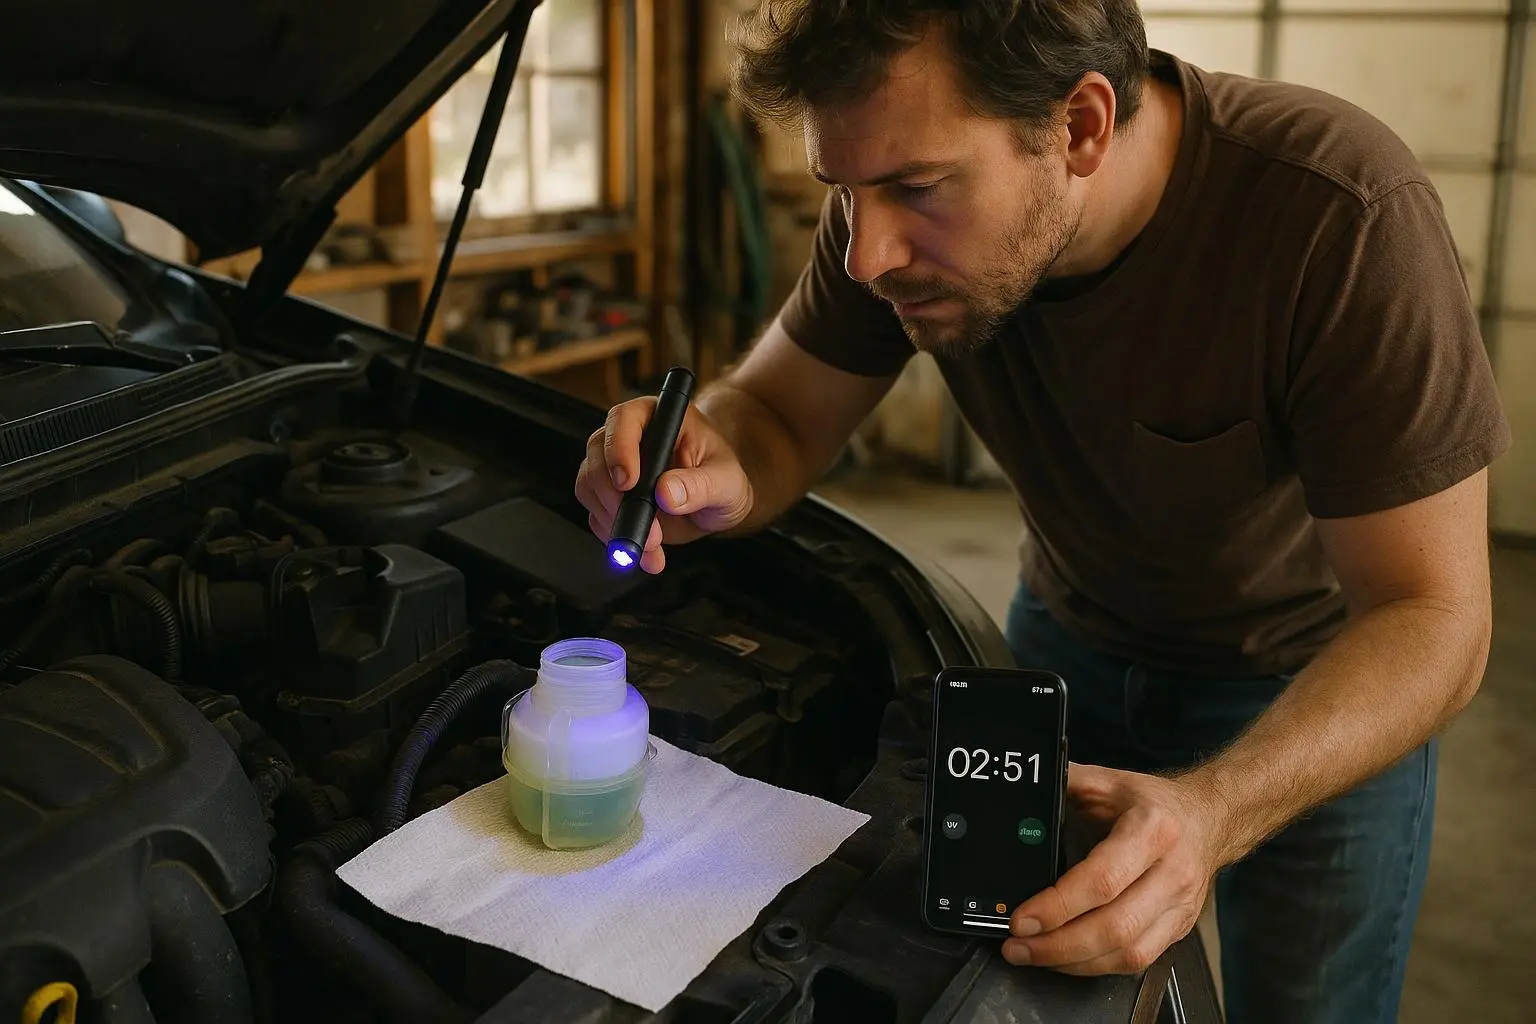
Phase 3: Pressure-simulated check and the UV glow (20 m
Ready to Optimize Your Dating Profile?
Get the complete step-by-step guide with proven strategies, photo selection tips, and real examples that work.