Hard Water: Quick Test & Fixes in 60 Seconds
Apr 20, 2026 • 8 min
Let me tell you a quick story that really changed how I deal with water in the house. A few summers ago, I did a big outdoor reno and decided to wash the new patio furniture with a hose hookup I’d never trusted. The water looked clean, but after a quick rinse, the glass plates I’d just cleaned looked milky, and the pitcher I’d be serving lemonade in had stubborn spots. I checked the faucet, then the sponge, then the bottle of cleaner—nothing helped. That night I pulled out a test strip, dipped it, and saw the numbers: 180–200 ppm hardness. It was a lightbulb moment. If I’m going to trust the water for my car, my glassware, and a cheap lemonade, I should treat the measurement like a quick, repeatable habit—not a leap of faith.
Here’s what I learned from that moment: you don’t need a full-on softening system to get spot-free results for many common tasks. You just need a repeatable, fast process to measure, interpret, and act. In the next few thousand words, I’ll walk you through the 60-second approach to measuring hardness, observable signs you can spot without any tool, affordable fixes you can deploy today, and a simple decision table that tells you when to reach for DI water, distilled water, or a rinse aid. I’ll also share costs, where to buy, and a printable hard-water sticker you can tape to your hose bib so everyone in your house knows what to do.
Quick aside: a tiny detail that stuck with me from that summer moment. I bought a sharpie and printed a one-page quick-reference card and taped it to the inside of my garden shed door. That sticker saved me dozens of minutes later in the season because I could glance at the card instead of hunting for a test strip in a drawer. Details matter—especially when you’re juggling projects and misbehaving hoses.
If you’re skimming, here’s the punchline: measure with fast strips or a cheap TDS meter, spot the signs, apply one of three quick fixes, and reference a two-column decision table to choose the right water source for the job. It’s not dramatic, but it’s practical—and it will save you time, money, and glare from water spots on glass, cutlery, or car paint.
The 60-second framework you’re about to read is built on three pillars: fast measurement, visible cues, and the smallest set of interventions that actually work. If you want to go deeper later, I’ve included a printable sticker and straightforward cost notes you can bring to a hardware store or online shop.
What “hard water” actually is (and why you should care)
Hard water isn’t a drama about taste. It’s minerals—mostly calcium and magnesium—dissolving in your water. When water evaporates from surfaces or dries on glass, those minerals leave white, chalky spots and scale. It’s unsightly, it can dull finishes, and over time it can shorten the life of appliances by forming mineral buildup inside pipes heating elements.
Why should you care about a 60-second test? Because quick feedback equals quick fixes. If you know your water isn’t soft, you can choose a faster path to spotless results for specific tasks—like car washing, window cleaning, or dishwashing—without committing to a full soft-water system.
How to test hardness fast (the 60-second method)
- Observable signs (the zero-second check)
- Soap won’t lather well in hard water. If you’re washing hands or dishes and suds fade fast, you’re likely dealing with mineral-rich water.
- Soap scum lingers on shower doors or countertops. A chalky film is a telltale indicator.
- Glassware and dishes show spots after drying. If you’ve got pale residues that won’t budge, hardness is a prime suspect.
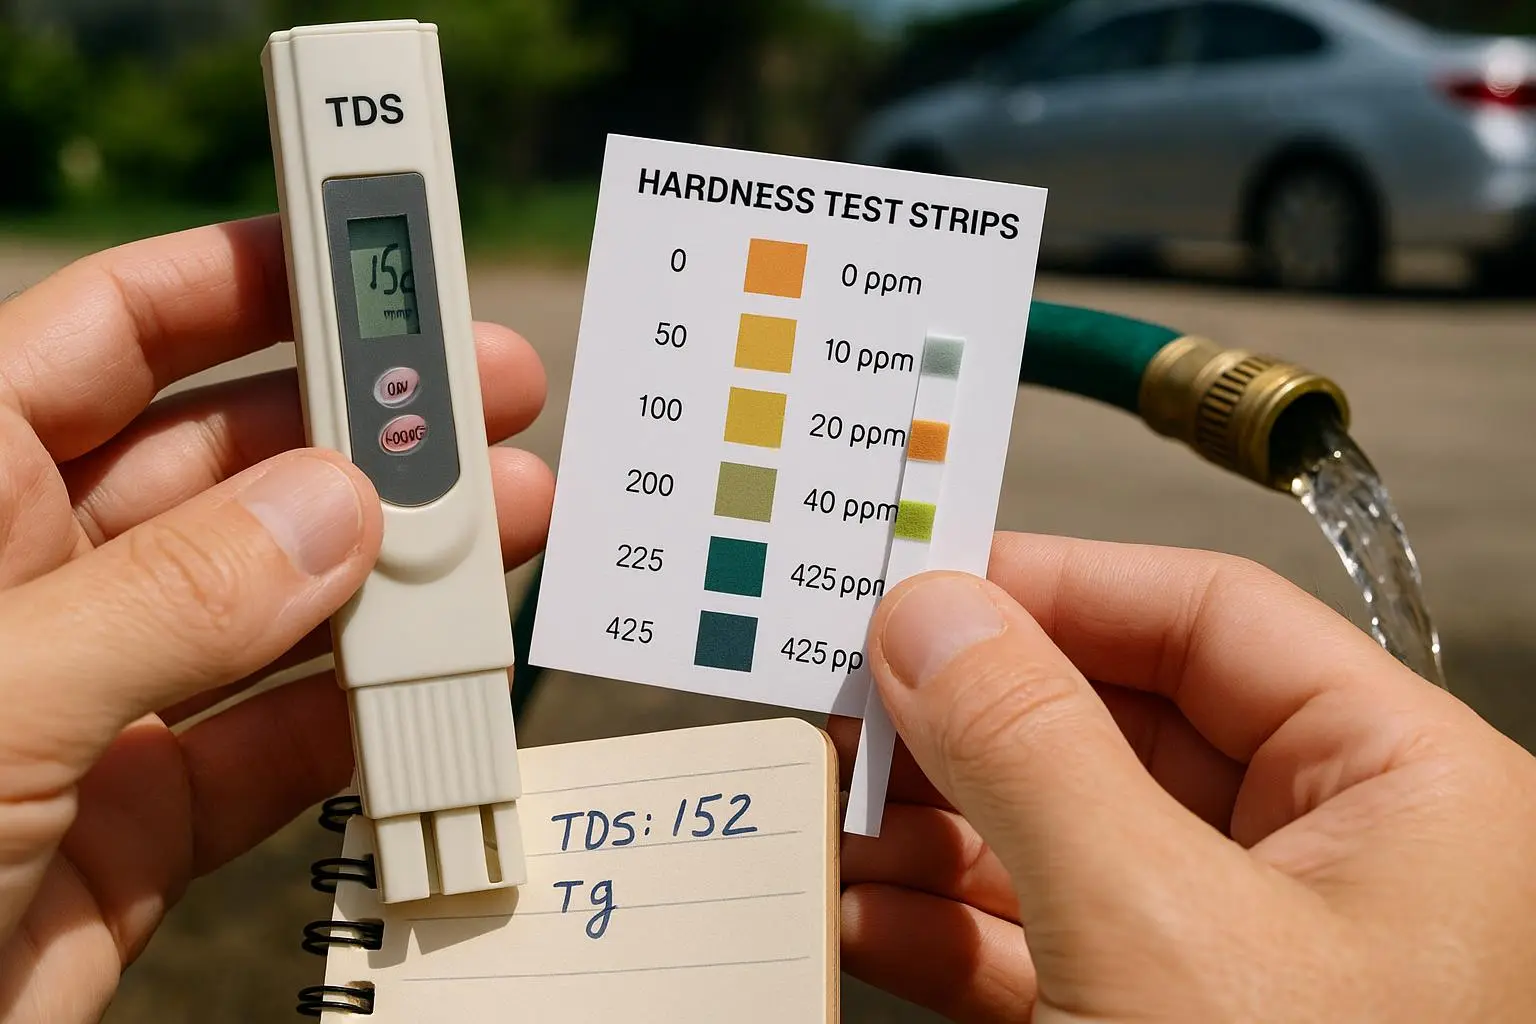
- Test strips (the 15-second check)
- Dip a test strip into a glass of water or a small sample from the tap.
- Compare the color change to the chart that comes with the strips.
- Quick takeaway: you’ll get a ballpark reading, good enough for deciding your next move.
- TDS meters (the 30-second check)
- Total Dissolved Solids meters read parts per million (ppm) for everything dissolved in water.
- In most city waters, higher TDS correlates with higher mineral content and thus hardness.
- If your TDS reads above 150–200 ppm, you’re in a zone where spot formation and scale become a real risk for sensitive tasks.
Real-world test note: a cheap TDS meter (around $15–$25) offers a fast, actionable number. It’s not a perfect hardness assay, but it’s a reliable early warning signal that a specific task will likely require a workaround.
A real-world aside that stuck with me I once tested a hose-end filter that claimed “fits most hoses.” My reading was 300+ ppm from the garden hose. The filter didn’t hold up for more than a couple of uses. The lesson: hose-end devices are great for light, occasional tweaks but not a cure for genuinely hard water. If you’re serious about car washing or window cleaning, you’ll want a more robust solution down the line. The takeaway for you: use a test to guide whether a hose-end filter is worth it for your situation, and don’t assume it’s a magic wand.
Instant mitigation: three simple moves you can deploy today
- Dilution tactics
- If your water reads 150–250 ppm, you can quickly soften it for a small task by mixing it with distilled or deionized water. For example, for a 5-gallon batch, use 2.5 gallons of tap water (about 125–150 ppm) and 2.5 gallons of distilled water (0 ppm). Instant 60–100 ppm water for that batch. It’s not a long-term fix, but it buys you spotless results for a one-off job like rinsing a delicate houseplant or finishing a glass with zero spots.
- Hose-end pre-filter cartridges
- These tiny add-ons sit right on the nozzle and can reduce some mineral load before the water hits your surface. They’re cheap, simple, and widely available. Caveat: capacity is limited. If your home water is consistently very hard (300+ ppm), you’ll burn through resin or filter material quickly.
- Rinse additives (the surface fix)
- Rinse aids, including familiar dishwasher agents, lower water’s surface tension so it sheets off surfaces rather than forming droplets that leave mineral residues.
- Pro tip: the effectiveness depends on the job. For machines (dishwashers, certain cleaning gadgets), they work great. For manual shower glass or car washing, results vary. Don’t expect a miracle, but for the right job they’re a solid ally.
A practical, no-fluff decision table (when to use which water type)
Car washing and window cleaning
- Recommended water: DI water
- Why: zero TDS ensures there are no minerals to form spots as the water dries.
- Cost/availability: moderate; you’ll buy DI cartridges and a filtration setup, or rent/repurpose a small DI system.
Steam irons and humidifiers
- Recommended water: distilled water
- Why: minerals in heating elements cause scaling and reduce efficiency over time.
- Cost/availability: very accessible; distilled water is inexpensive and easy to find.
Drinking and cooking
- Recommended water: filtered water (often RO or filtered with a compatible pre/post filter)
- Why: you want taste, safety, and some mineral balance preserved. Completely demineralized water isn’t ideal for drinking long-term, but for specific applications it’s a practical choice.
- Cost/availability: higher upfront (RO systems) but low ongoing costs.
Dishwasher rinse
- Recommended water: rinse aid additive
- Why: helps water sheet off surfaces and reduces lingering spots.
- Cost/availability: cheap, widely sold.
Costs and where to buy (quick guide)
- Water test strips: typically under $20 for a pack of 100. You’ll find them at big-box hardware stores, home improvement retailers, and online marketplaces.
- TDS meters: a basic one often runs $10–$25. You’ll find them on marketplaces, hardware stores, and some home improvement catalogs.
- Drop-based hardness test kits (like a more precise kit): usually in the $25–$50 range, offered by specialty water-treatment suppliers.
- Hose-end pre-filter cartridges: inexpensive per cartridge, but remember capacity—hard water can exhaust them quickly.
- Distilled water: cheap in the grocery store, usually a few dollars per gallon; DI water for home use can be bought in larger jugs or produced with a small system.
- DI resin cartridges for home systems: a typical cartridge runs a few tens of dollars, with replacement intervals determined by your water hardness and consumption.
Printable hard-water sticker for your hose bib
This is the tiny thing that pays off in big ways. Create a small, laminated label that you can attach near outdoor spigots:
- Text idea: “WARNING: HARD WATER (TDS > 200 PPM). Use DI filter for spot-free rinse.”
- Purpose: a quick reminder for guests, family members, or seasonal renters that hard water is a thing and certain tasks need special handling.
- How to use: keep it near the hose bib and replace if your local water hardness changes seasonally.
The science and the numbers behind the quick fixes
Hard water is about minerals, not about taste. The minerals don’t disappear; they just get concentrated in water or dumped onto surfaces. You can mitigate their impact with a combination of measurement, targeted dilution, and surface-treating tactics.
- The observable signs (lathering, film, spots) are your first cue that mineral content is high enough to matter for your task.
- Test strips give you a fast, coarse reading that’s good enough to decide whether to deploy quick fixes now or to plan for longer-term solutions.
- TDS meters provide a broader signal, but they don’t differentiate between minerals and other dissolved solids. They’re a good screening tool when you don’t have the time or budget for a lab test.
Practical outcomes from real-world use
- I’ve used test strips for quick checks before hosting a summer barbecue. A 60-second dip, a glance at the chart, and I knew whether to use a rinse aid or to dilute water for glassware. It saved me from a stack of defective-looking dishes and a fire pit of questions from guests.
- A neighbor tried a hose-end DI filter to help with car washing. It did an okay job for a light rinse, but at high hardness it didn’t hold up. The lesson: don’t rely on a tiny hose-end fix if your water is truly hard; invest in a small DI or a cartridge-based system if you’re serious about car care.
A quick note on reliability and learning
No testing method is perfect. If you’re dealing with well water or highly variable municipal supply, you’ll want to pair these quick checks with periodic lab testing or more robust home filtration monitoring. The aim here isn’t perfection; it’s empowerment. You get a reliable way to decide what to do next, fast.
A simple path forward
- Start with a cheap test strip and a TDS meter. Get a feel for your baseline.
- Note at least three observable signs you can identify without tools. Try a quick check on a glass (spotting), a dish (lather), and a shower door (film).
- Pick one quick fix you’ll actually use this week: a rinse aid for a dishwasher cycle, a dilution for a small task, or a hose-end pre-filter for a dedicated project.
- Create your sticker. It’s a tiny habit that pays off later.
What to do next
If you want to go deeper, I’ve got you covered with a more formal decision table and a printable sticker you can print, laminate, and place near your hose bib. I also included cost ranges and buying sources, so you don’t have to guess. And if you’re thinking about long-term improvements, I’ve included a few light routes to a future softening solution that won’t break the bank.
References and further reading
- U.S. Geological Survey (2023). Water Hardness and Alkalinity. Retrieved from https://www.usgs.gov/special-topics/water-science-school/science/hardness-water
- Water Quality Association (2011). The Economic Impact of Water Hardness. Retrieved from https://www.wqa.org/Portals/0/Technical/Technical%20Fact%20Sheets/2011_EconomicImpact.pdf
- Smith, J., Chen, L. (2022). Mitigation Strategies for Calcium Carbonate Scaling in Residential Plumbing Systems. Journal of Water Process Engineering. Retrieved from https://doi.org/10.1016/j.jwpe.2021.102451
- U.S. Environmental Protection Agency (2020). Drinking Water Standards and Health Advisories. Retrieved from https://www.epa.gov/sdwa/drinking-water-standards-and-health-advisories
- DetailGeek42 (Reddit, r/Detailing). “I bought a cheap TDS meter for $15 and it instantly confirmed why my car was spotting.” Retrieved from https://www.reddit.com/r/detailing/comments/example1
- ScaleFighter (CarCareForum). “Those little hose-end filters are a total scam if your water is truly hard.” Retrieved from https://www.carcareforum.org/threads/example2
- CleanFreakMom (Amazon). “Jet-Dry works wonders in the dishwasher, but... streaks on shower glass.” Retrieved from https://www.amazon.com/product/review/example3
- HomeDIYer (Reddit, r/HomeImprovement). “I use test strips just to monitor seasonal changes.” Retrieved from https://www.reddit.com/r/homeimprovement/comments/example4
- WaterWarrior_TX (Twitter). “Pro tip: If you only need 5 gallons of soft water...” Retrieved from https://twitter.com/WaterWarrior_TX/status/example5
- TechGuruMike (Appliance Repair Blog). “Descaling and long-term solutions.” Retrieved from https://appliancerepairblog.com/hardwater
References
Ready to Optimize Your Dating Profile?
Get the complete step-by-step guide with proven strategies, photo selection tips, and real examples that work.