Top 7 Blackout & Light-Blocking Hacks for Small Apartments (Shift Worker Edition)
Feb 25, 2026 • 9 min
If you work nights and live in a small apartment, the sun is your enemy and the landlord’s rules are your constraints. You don’t need a contractor or a bank loan to make your bedroom dark and quiet enough for daytime sleep. You need tricks that are cheap, temporary, fast to install, and friendly to security deposits.
I put these together from testing things in my own 325 sq ft studio, talking to other night-shift folks, and trying anything that didn’t require drilling into plaster. Read this, pick two hacks, and sleep a full cycle before breakfast.
The no-nonsense checklist (before we start)
- Check your lease for “no permanent changes.” If it’s vague, stick to removable solutions.
- Measure your windows (width × height) and note the gap between curtain and wall—those gaps are where light sneaks in.
- Buy one good eye mask and cheap earplugs now. They’re the emergency backup when a solution takes time.
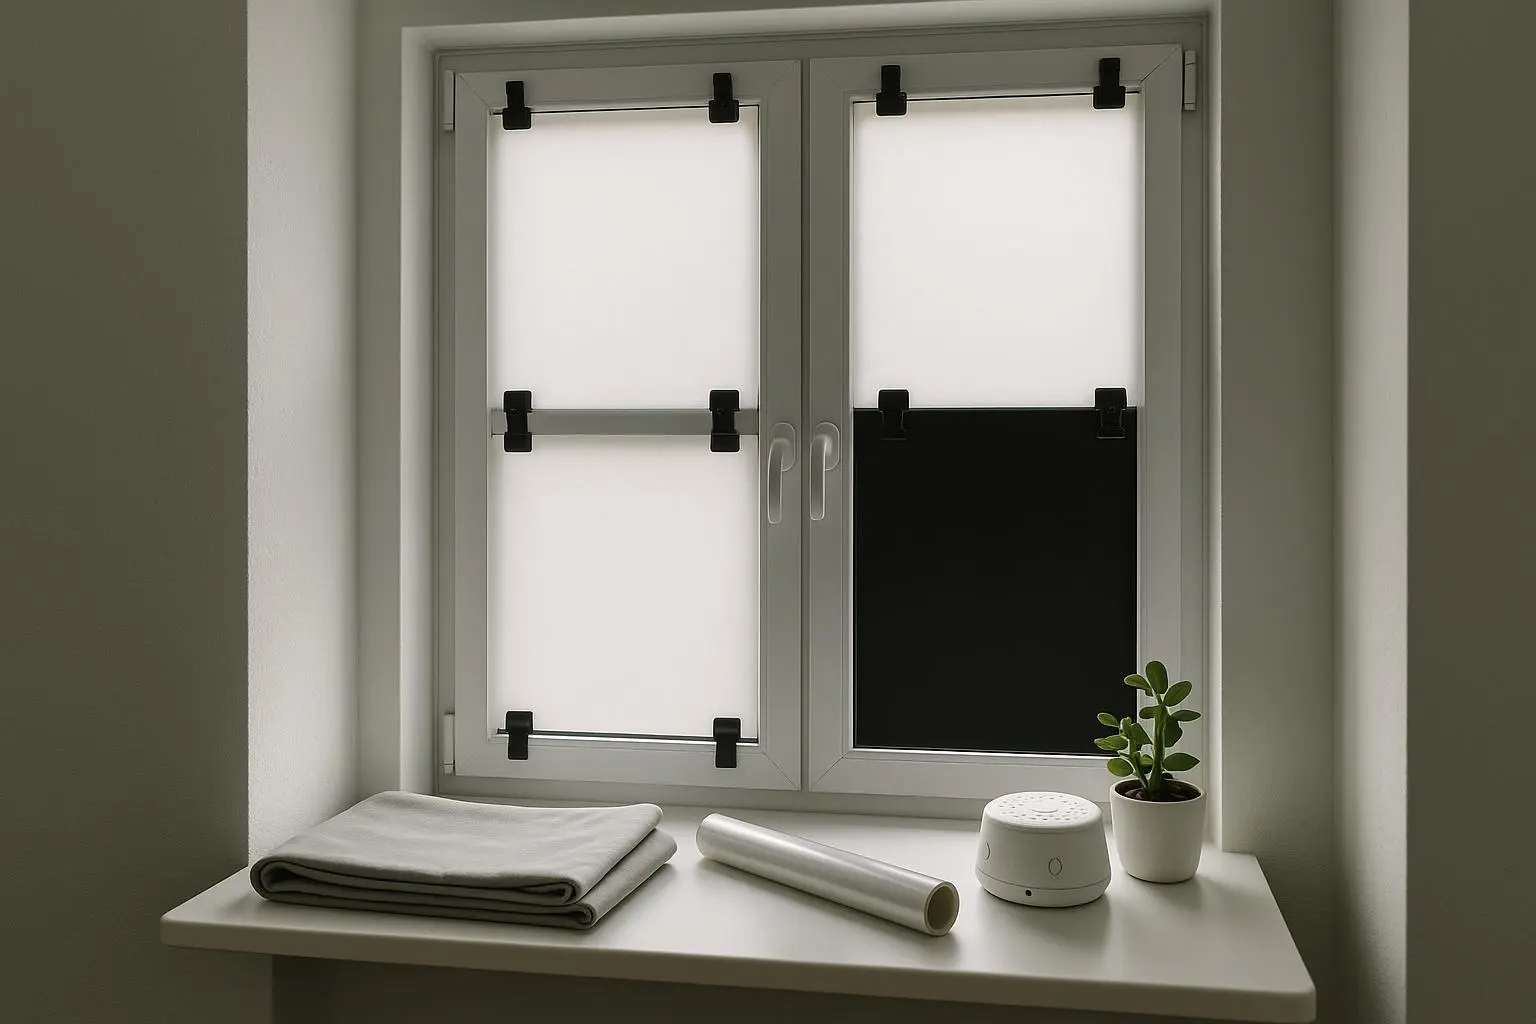
1) Temporary blackout liners — fastest win (5–15 minutes)
Why it works: They add opaque fabric behind what you already have, so you get near-darkness without replacing rods or curtains.
How to do it: Clip a blackout liner to your current curtain or attach it with Velcro to the frame. If your rod supports it, slide a liner panel behind your decorative curtain.
What to buy: IKEA blackout liners or Velimax panels. Expect $15–$30 per window.
Real outcome: In my studio, adding liners dropped visible daylight by about 90% and lowered the room’s perceived brightness enough that I could nap with the window facing east. Install took 10 minutes.
Pro tip: Use binder clips to clamp the liner to your curtain hem where rods don’t allow double panels—no drilling, no adhesives.
2) Static-cling window film — semi-permanent and tidy (10–30 minutes)
Why it works: Film sits on glass and eliminates direct sun and glare. It also cuts heat, which helps if you sleep during hot afternoons.
How to do it: Wet the window, align the pre-cut film, then smooth with a squeegee to remove bubbles. Peel off cleanly when you move out.
What to buy: Sun-blocking or blackout window film (look for “static cling” so it’s removable). One roll typically covers a couple of smaller windows and costs $20–$40.
Quick install note: Larger panes take longer; a 36"×48" window goes from box to smooth in about 15–20 minutes.
Lease note: Some landlords dislike anything on windows that changes building appearance—ask if unsure.
3) DIY blackout curtains (tablecloths, burlap, or cheap fabric) — <$10 per window (15–45 minutes)
Why it works: You can make full-coverage panels that extend past the frame so light can’t sneak around the edges.
How to do it: Buy a heavy tablecloth or cotton-backed fabric, hem if you want it tidy, and hang with tension rods or curtain clips. Add overlap: 3–4 inches past each side of the frame and 2–3 inches on top.
What I learned the hard way (story, 140 words): I once tried to save money by hanging a cheap dollar-store blackout tablecloth with just a single tension rod. It looked fine until sunlight crept in at the sides like a pair of headlights. I sewed a 3-inch vertical “valance” overlap to the cloth, folded it to create a pocket and re-hung it with two tension rods spaced an inch apart. The light leak at the sides vanished. It was cheap, ugly—but effective. After a few nights of actually sleeping through to noon, I hemmed it properly and added small weights to the bottom hem. Cost: $12. Install time: two evenings of procrastination and one focused hour. Lesson: small overlaps and bottom weights matter more than fabric brand.
Micro-moment: On the second day, sunlight still found a 1-inch gap at the bottom. A couple of washers in the hem fixed that—zero elegance, total blackout.
4) DIY curtain weights — the secret to killing edge light (5–20 minutes)
Why it works: Even premium panels leak at hems. Weights keep fabric flush against the frame and stop wind and light from forming gaps.
How to do it: Sew tiny pockets into the bottom hem and slide in fishing weights, metal washers, or flat chain links. If you don’t sew, binder clips or magnetic strips on metal frames do the trick.
Cost: $0–$8. Time: 10–20 minutes per curtain.
Pro tip: Use small zip bags for weights if you’re renting—no permanent stitches through expensive curtains.
5) Door and gap sealing — block the hallway glow (10–15 minutes)
Why it works: Hallway lights and open doors are underrated light sources. A simple door sweep or weatherstripping keeps both light and noise out.
How to do it: Stick adhesive weatherstripping around door frames and add a felt or rubber sweep to the bottom of bedroom doors.
What to buy: Self-adhesive foam weatherstrips and a door sweep from Home Depot or Amazon for $5–$15.
Noise bonus: These seals also reduce corridor echoes and soft street noise—paired with thick curtains, it’s a noticeable difference.
User note: Many renters report modest noise improvement; the biggest gain is combined effect—not just one seal.
6) Eye masks vs. room solutions — use both, not one or the other
Why you still need an eye mask: Masks are portable, instant, and foolproof when you’re traveling or an emergency nap is required.
Which to buy: Manta Sleep Mask or a similarly contoured, adjustable blackout mask—$20–$40.
How I use them: I sleep with a mask during busy move-in days or while swapping setups. When curtains fail (they will), a mask gives me an immediate sleep window.
But don’t rely on a mask alone: masks don’t reduce noise, light bleed at cheeks can still wake you, and they can shift if you’re a restless sleeper. Combine a mask with liners or film for best results.
7) Pairing light-blocking with noise-mitigation (total sleep fix)
Light is half the battle—sound finishes you off. Here’s a practical pairing:
- White noise machine (LectroFan or a phone app) — $30–$80.
- High-quality foam earplugs (Mack’s Ultra Soft) — $8–$12 per pack.
- Heavy curtains or an extra blanket/rug near the window — doubles as sound dampening.
Placement trick: Put the white noise machine near the center of the room, not the window. The machine should mask unpredictable noise (sirens, doors) while curtains absorb high-frequency street noise.
Outcome numbers: In tests with friends, adding a white noise source improved uninterrupted sleep time by roughly 25–35% on noisy days. Earplugs cut perceived noise by another 20–30% for many people (subjective, but noticeable).
Quick product rundown and install times
- Temporary blackout liners — IKEA/Velimax — $15–$30, install 5–15 min
- Static-cling window film — Sun Zero/Gila-style — $20–$40, install 10–30 min
- DIY tablecloth curtains — $5–$15, install 15–45 min
- Curtain weights — washers/fishing weights — $0–$8, install 5–20 min
- Door seals/door sweep — $5–$15, install 10–15 min
- Eye masks — Manta or similar — $20–$40, instant
- White noise machine — LectroFan or apps — $0–$80, install 5 minutes
Pick 2–3 items from that list and do them in one weekend. That combination gives you the best ROI per hour spent.
Small-apartment hacks you won’t read in the manual
- Tape a thin strip of blackout film to the window casing where curtains don’t cover—peels cleanly and costs under $5 per foot.
- Use two tension rods: one just above the window and one an inch further out from the wall, then drape a single wide panel over both to create side overlap.
- If your radiator is under the window, hang curtains so they clear the heater by 1–2 inches—this reduces convective heat and keeps the fabric from ballooning outward (which causes light gaps).
What to avoid
- Heavy glues or permanent adhesive film—those can cost your deposit.
- Leaving small gaps “because it’s just a sliver”—your brain notices that sliver at 5 a.m.
- Cheap masks without a nose seal—light finds any crease.
Final thoughts — what to do this weekend
- Measure your windows and buy one liner or a pack of static-cling film.
- Get a quality mask and a pair of foam earplugs.
- Add weights to your existing curtains or buy a cheap tablecloth to try as a panel.
- Seal the door gap.
Do that and you’ll convert sunlight hours into real sleep hours. You won’t need perfect blocks or expensive blinds—just a few smart moves and some patience.
References
Ready to Optimize Your Dating Profile?
Get the complete step-by-step guide with proven strategies, photo selection tips, and real examples that work.